Installation
We recommend using JupyterLab to write and run code directly on the server.
Port
Before configuring Jupyter Lab, make sure you have set up port forwarding as described in the "Connecting to the Server" section ([Windows](../01-connect/win.md#_1), [macOS](../01-connect/mac.md#_1)).
Uv
If you are not familiar with setting up environments, please install uv first ([installation guide](../02-uv/install.md)).
1) Install Jupyter Lab in the virtual environment.
2) Check the installation. If the version number is returned successfully, it means the installation was successful.

3) Create the Jupyter Lab configuration file. Note the location of the configuration file mentioned in the prompt.

Cannot find the configuration file
**Cause 1**

You did not check the file path.

**Solution**

Please check the path indicated in the prompt.

**Cause 2**

Xftp is not showing hidden files.

**Solution**

Refer to the [page](../01-connect/win.md#sftp) for instructions on setting up Xftp to show hidden files.
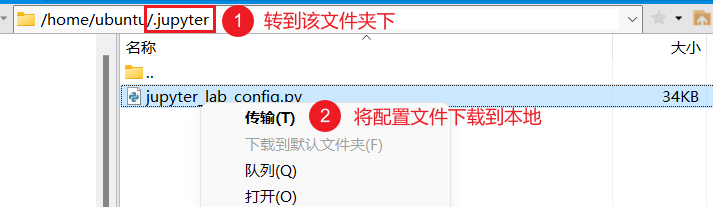
4) Use an SFTP client to download the configuration file to your computer for editing.
5) Search for the following configuration options, uncomment them, and change the values as specified. Note that the first three settings must be completed, and the last one is optional.
Do not open the browser
Do not open the browser after starting Jupyter Lab (otherwise, it will open the browser on the server side).

Search for:

```python
c.ExtensionApp.open_browser
```

and set it to `False`.

<figure><img src="/assets/jupyter-browser.png"></figure>
Specify the port
Start Jupyter Lab on the specified port. Please request a port number from the administrator, and choose any number between 10000 and 65535. Here, we use port 22222 as an example.

Search for:

```python
c.ServerApp.port
```

and set it to the assigned port number.

<figure><img src="/assets/jupyter-port.png"></figure>

??? question "Who should I request the port number from?"

        Only users of certain servers need to request a port number from the administrator. If there are not many server users, you can decide on a port number yourself.

        Since each port can only be used by one process, this means that if you use the same port as someone else, they may be able to see and manipulate your Jupyter Lab. Therefore, it is still recommended to report the chosen port number to the server administrator to avoid port conflicts.

        If you find that the port is frequently unavailable, it may be due to a conflict with another user's port. In that case, consider changing to a different port.
Set a password
Start Python on the server.

```bash
python
```

Enter the following command to generate an encrypted string for the password.

```python
from jupyter_server.auth import passwd; passwd()
```

Copy the string starting with `sha1:` or `argon2:`.

<figure><img src="/assets/jupyter-gen-passwd.png"></figure>

??? question "Cursor does not move when entering the password"

   In macOS and Linux systems, the cursor does not move when you enter the password. If you see the cursor not moving, please ignore it and simply enter the password and press Enter.

Search for the following in the configuration file:

```python
c.ServerApp.password
```

and set it to the string starting with `sha1:` or `argon2:`.

<figure><img src="/assets/jupyter-set-passwd.png"></figure>

Exit Python.

```python
exit()
```
Set a token
This setting is optional and not required. It is mainly used for passwordless authentication of Jupyter Lab using VSCode.

Search for `c.ServerApp.token` in the configuration file, uncomment it, and set its value to a specified string, such as `foobar`.

        After restarting Jupyter Lab, you will notice that the URI displayed by the system has changed to `http://localhost:22222/lab?token=foobar`. You can use this URI with the token to log in to Jupyter Lab without a password.

However, it should be emphasized that this method is less secure compared to password login.
Error message IndentationError: unexpected indent after starting
**Cause**

This is because there is incorrect indentation in the `jupyter_lab_config.py` file, usually due to not removing the spaces when uncommenting.

**Solution**

Fix the indentation issue in the `jupyter_lab_config.py` file.
6) Use SFTP to transfer the modified configuration file back to its original location on the server, replacing the original configuration file.
7) (Optional) iPython settings. Enter ipython profile create in the command line to get the location of the ipython configuration file. Usually, the location is ~/.ipython/profile_default/ipython_config.py. Open the file and find the following configuration options. We recommend setting them as follows.
Display multiple outputs
```python
c.InteractiveShell.ast_node_interactivity = 'all'
```
This allows your Jupyter Lab to display multiple results in one cell.
Execute by default
c.InteractiveShellApp.exec_lines = [
        "import pandas as pd",
        "import numpy as np",
        "import matplotlib.pyplot as plt",
        "pd.set_option('display.max_columns', 500)",
        "pd.set_option('display.max_rows', 100)",
        ]
This automatically imports pandas and numpy, and adjusts the display range of pandas tables every time a new notebook is opened.

You can add other code that you don't want to write every time here.